 |
| This is my latest make do and style moment. Tweet or Instagram your fav styling snaps too and tag #makedoandstyle. |
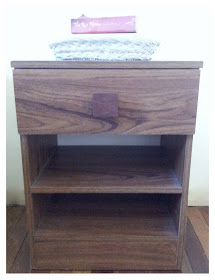
I really do believe that there are some household items that are bound to eventually leave you and there are some that are just meant to stay. For example, this bedside table had many reasons why it should leave.
- It was old and depending on your fashion taste somewhat out-dated
- It was wood veneer, yes not even solid wood!
- Lastly, it was not overly beautiful or modern
In my opinion, it also had a good few reasons why it should stay...
- It had quite a lovely contemporary line
- I personally quite like late 70's and 80's style furniture
- Furniture made with wood veneer uses less timber than the same piece of furniture made from solid wood, now that's kind of forward thinking, ecofriendly and resourceful right??
- It also belonged to Grandpa Honner, whom I never had the pleasure to meet!
- Lastly, I do love a challenge and I knew I could refashion it in some small way so that it would blend more stylishly with our renovated post war Queenslander home.
And so I think, that it was written on the wall that this one should stay! Do you think so too?? I remember watching Grand Designs one day, do you watch that show?? I love it! They were presenting a home that had been designed by this fabulously creative pair. I remember seeing fabric covered doorways and architraves... it was truly unique and beautiful to see the way they had stretched fabric over doorways like a stretched canvass artwork. I liked it!
Refashion your furniture using fabric
Requirements
Cupboard or bedside table
Fabric
Staple Gun
Elmers Glue
Pegs
Method
Unscrew and remove any knobs from draw
Stretch fabric over front section of draw
Glue and staple stretched fabric ends to bedside table draw edges
 |
| Glue edges of fabric underneath draw edge and peg to secure |
 |
| Ensure fabric is stretched tightly over draw |
 |
| Staple gun stretched fabric into place |
 |
| Tightly fold corners in a secure triangle and staple neatly into place. Use a hammer to gently tap staples in so that they sit quite smoothly along edge. |
 |
| Insert a small hole in fabric and screw knob back into place |
 |
| Style as per your taste |
Today's "antique sugar tin- garage sale find" looks lovely on it too
I do believe this spare room project is finished now although needless to say the spare room still has a way to go. Thankyou for popping in!
Rachael xx
Visiting here, if you would like to check out some other great projects.


Pretty damn cute! x
ReplyDeleteAw thanks so much Steph, glad this one stayed!
ReplyDelete